
Table of Contents
ToggleGood bathroom lighting does more than help someone find their toothbrush at 6 a.m. It affects everything from makeup application to shaving precision, and a poorly lit vanity can turn a simple morning routine into a frustrating guessing game. Whether renovating a master bath or upgrading a powder room, choosing and installing the right vanity lighting can transform both function and ambiance. This guide walks through fixture types, selection criteria, installation basics, and the common pitfalls that trip up even experienced DIYers.
Key Takeaways
- Vanity lighting at the mirror eliminates shadows during grooming tasks and is essential for precision work like makeup application, shaving, and contact lens insertion—overhead lighting alone creates unflattering shadows under the eyes and chin.
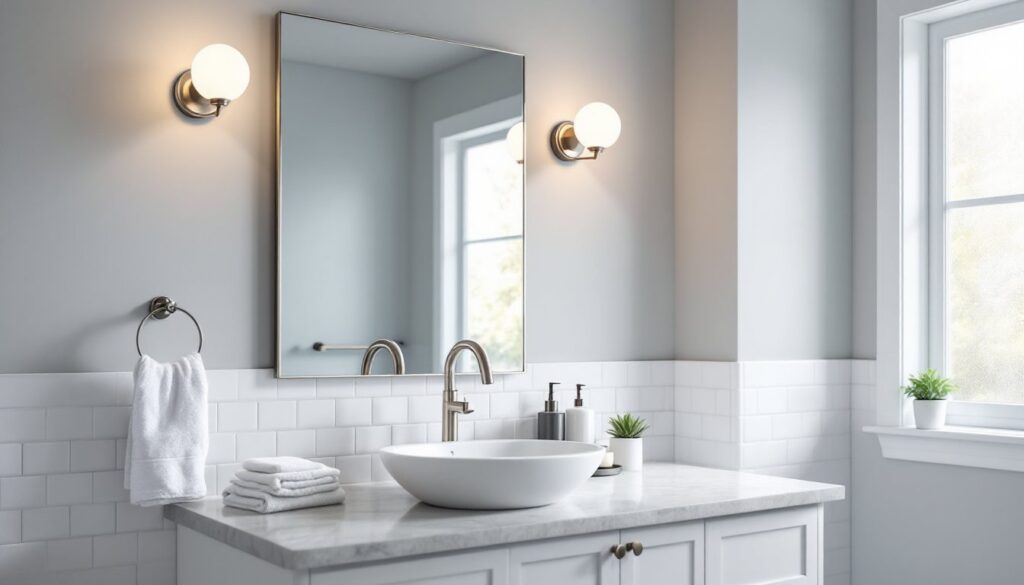
- Wall-mounted sconces positioned at 60–66 inches from the floor and 36–40 inches apart provide the gold-standard cross-illumination, while over-mirror bar lights work best when sized to about 75% of your mirror width and mounted 75–80 inches from the floor.
- Choose fixtures with a color temperature of 3000K to 4100K (neutral to cool white) and a CRI of 90 or higher to ensure accurate color rendering of skin tones and makeup, with 1600–2000 lumens recommended for single-sink vanities.
- Always verify your vanity lighting fixture’s moisture rating for bathroom zones—fixtures within 8 feet horizontally or 3 feet vertically of a tub or shower must meet damp or wet location requirements for safety and code compliance.
- Turn off power at the breaker and verify circuits are dead before any electrical work, use a level for symmetrical sconce placement, and consider installing a dimmer switch ($15–$40) to adapt lighting for different moods and times of day.
- Match fixture finishes to your faucets and hardware for visual cohesion, use dimmable LED bulbs to minimize heat in moisture-prone bathrooms, and run your exhaust fan during and 20 minutes after showers to extend fixture lifespan.
Why Vanity Lighting Matters More Than You Think
A bathroom vanity is where precision tasks happen daily, shaving, applying makeup, flossing, contact lens insertion. All of these require even, shadow-free illumination at face level. Overhead lighting alone, whether recessed cans or a ceiling fixture, casts shadows under the eyes, chin, and nose, making it nearly impossible to see details clearly.
Task lighting at the mirror is essential. The difference between a well-lit vanity and a dim one isn’t just aesthetic, it’s functional. Poor lighting leads to uneven makeup, missed stubble, and eye strain. For aging eyes, adequate lux levels become even more critical.
Beyond function, vanity lighting sets the bathroom’s tone. A sleek LED bar over the mirror delivers a modern, spa-like feel, while vintage sconces flanking a mirror add warmth and character. The right fixture choice ties the room together and complements finishes like faucets, hardware, and cabinetry.
Finally, bathrooms are high-moisture environments. Fixtures rated for damp or wet locations (depending on proximity to showers and tubs) ensure safety and longevity. Choosing UL-rated fixtures appropriate for bathroom zones isn’t just smart, it’s code in most jurisdictions.
Types of Bathroom Vanity Lighting Fixtures
Sconces and Wall-Mounted Lights
Sconces mounted on either side of the mirror are the gold standard for eliminating shadows. Placing fixtures at 60 to 66 inches from the floor (roughly eye level for most adults) and 36 to 40 inches apart provides balanced, cross-illumination. This setup mimics professional makeup mirrors and prevents the harsh shadows overhead lighting creates.
Wall-mounted sconces come in countless styles, from industrial cage designs to frosted glass globes, and can be hardwired or, in some cases, plug-in. For bathrooms with limited wall space or small shower configurations, compact sconces keep the vanity area open without sacrificing light quality.
When selecting sconces, consider bulb accessibility. Fixtures with exposed bulbs look crisp but can create glare if the wattage is too high or the bulb too visible. Frosted or opal glass diffusers soften the light and reduce eye strain. If the bathroom has a narrow footprint, sconces with adjustable arms or swing-arm designs offer flexibility.
Dimmer compatibility is another consideration. Installing a dimmer switch allows users to dial down brightness for late-night trips or amp it up for detailed grooming. Not all LED bulbs are dimmable, so verify compatibility before purchase.
Over-Mirror Bar Lights
Bar lights, also called vanity bars or bath bars, mount horizontally above the mirror and provide broad, downward illumination. They’re a popular choice for single-sink vanities and work well in bathrooms where side-wall mounting isn’t feasible due to medicine cabinets, windows, or structural constraints.
A typical vanity bar ranges from 24 to 48 inches in length, depending on mirror width. As a rule of thumb, the fixture should be about 75% the width of the mirror to avoid a lopsided look. For a 60-inch double vanity, a 36- to 48-inch bar ensures even coverage across both sinks.
Bar lights come in multiple configurations: integrated LED units, multi-bulb fixtures with Edison-style exposed bulbs, or linear tubes with acrylic diffusers. Integrated LED bars are energy-efficient and low-maintenance but can’t have bulbs swapped if the LEDs burn out (though they typically last 25,000+ hours). Multi-bulb bars offer flexibility, users can choose bulb color temperature and replace individual bulbs as needed.
Mount the bar 75 to 80 inches from the floor for optimal face illumination without glare. If the ceiling is low (under 8 feet), slightly lower placement prevents the fixture from feeling cramped. Ensure the junction box is centered over the mirror before installation: relocating a box after drywall is up is a hassle.
How to Choose the Right Vanity Lighting for Your Bathroom
Start with color temperature, measured in Kelvin (K). For vanity lighting, 2700K to 3000K (warm white) feels cozy but can skew makeup colors slightly yellow. 3500K to 4100K (neutral to cool white) is closer to natural daylight and preferred for task-heavy bathrooms. Many designers recommend 3000K as a middle ground that’s flattering without distorting color accuracy.
Next, calculate lumens. A general guideline is 1600 to 2000 lumens total for a single-sink vanity (roughly equivalent to two 75-watt incandescent bulbs). Double vanities may need 3000+ lumens, split between multiple fixtures. Overlighting a small bathroom creates glare: underlighting a large one leaves the space dingy. According to guidance from lighting design experts, achieving 70–80 foot-candles at the mirror plane is ideal for grooming tasks.
Fixture size and scale should match the vanity and mirror proportions. An oversized bar light above a 30-inch mirror looks awkward, while tiny sconces flanking a 60-inch mirror get lost visually. Measure carefully and mock up placement with painter’s tape before drilling.
Style cohesion matters, too. If the bathroom has brushed nickel faucets and cabinet pulls, matching fixture finishes create visual harmony. Mixing metals is acceptable, matte black sconces with chrome faucets can look intentional, but avoid more than two metal finishes in a small space.
Finally, verify the fixture’s moisture rating. Bathrooms are divided into zones based on proximity to water sources. Fixtures within 8 feet horizontally and 3 feet vertically of a tub or shower should be rated for damp locations at minimum. Fully enclosed shower lighting requires a wet-location rating. Check the UL label before purchase.
Installation Tips for DIY Vanity Lighting Projects
Before starting, turn off power at the breaker, not just the light switch. Verify the circuit is dead using a non-contact voltage tester. Bathroom electrical work falls under NEC Article 210.8, which requires GFCI protection for most bathroom outlets and fixtures in wet zones. If unsure about existing wiring or GFCI compliance, consult a licensed electrician.
Removing the old fixture is straightforward: unscrew the mounting plate, disconnect wire nuts, and pull the fixture free. Inspect the junction box. If it’s plastic and the new fixture is heavy (over 5 pounds), replace it with a metal box rated for fixture weight. Loose or undersized boxes cause fixtures to sag or fail.
For new installations or relocating fixtures, fish wire through the wall cavity. This often requires cutting drywall, so plan accordingly. Running wire horizontally between studs is easier than vertical runs across multiple floor joists. If the bathroom shares a wall with another room, accessing the backside can simplify the job. A stud finder and flexible drill bit (at least 18 inches long) are invaluable here.
Mount the new fixture’s crossbar or mounting plate to the junction box using the provided screws. Connect wires: black (hot) to black, white (neutral) to white, and bare copper or green (ground) to the ground screw or bare wire in the box. Twist connections clockwise with wire nuts and tug gently to confirm they’re secure. Tuck wires neatly into the box before securing the fixture.
If installing sconces on either side of a medicine cabinet or mirror, measure from the center of the mirror outward to ensure symmetry. Use a level, eyeballing it leads to crooked fixtures that are obvious once the mirror is hung. For drywall anchors (if not hitting a stud), use toggle bolts or molly bolts rated for the fixture weight.
Bulb selection matters. LED bulbs are the most energy-efficient and generate minimal heat, important in a confined, moisture-prone space. Avoid high-wattage halogens: they run hot and can degrade fixture components over time. If dimming, choose bulbs labeled “dimmable” and pair them with a compatible dimmer (trailing-edge dimmers work best for LEDs).
Once wired, restore power and test. If the fixture doesn’t light, recheck connections and verify the breaker is on. If it flickers, the dimmer may be incompatible or the bulb wattage too low for the dimmer’s load range.
Common Vanity Lighting Mistakes to Avoid
Mounting fixtures too high is the most frequent error. A bar light 6 inches above an 8-foot ceiling might look proportional on paper, but it casts shadows downward, defeating the purpose. Keep vanity lighting between 75 and 80 inches from the floor for optimal face illumination.
Ignoring color rendering index (CRI) is another pitfall. CRI measures how accurately a light source reveals true colors, rated 0–100. Bulbs with a CRI of 90 or higher render skin tones and makeup colors faithfully. Cheap LEDs with CRI below 80 can make faces look washed out or greenish. Spend a few extra dollars on high-CRI bulbs, it’s worth it for a space where appearance matters.
Skipping the dimmer is a missed opportunity. Bathrooms serve multiple moods, bright task lighting for morning routines, softer ambiance for evening baths. A dimmer switch costs $15–$40 and takes minutes to install. For homeowners working on compact bathroom layouts, adjustable lighting can make the space feel larger and more adaptable.
Mixing bulb types in the same fixture creates uneven color temperature and brightness. If a multi-bulb bar holds four sockets, use four identical bulbs. Mixing a 2700K bulb with a 4000K bulb results in a patchy, unprofessional look.
Overlooking ventilation is a subtler issue. Bathroom humidity shortens bulb and fixture lifespan. A properly sized exhaust fan (rated for the bathroom’s square footage) reduces moisture buildup and keeps fixtures performing longer. Run the fan during and for 20 minutes after showers.
Finally, forgetting to check local codes before starting electrical work can lead to headaches during home sales or inspections. Some jurisdictions require permits for new circuits or fixture relocations. While replacing a fixture on an existing box often doesn’t need a permit, adding new wiring usually does. When in doubt, call the local building department or hire a licensed electrician for complex runs.